Padlet is a very useful whiteboard tool used mostly by educators and teachers. Padlet is in the form of a digital whiteboard where teachers can create an account and gain access to the board where they can add texts, images, links, diagrams, and any other useful materials to share with their students.
It is collaborative as the students in turn can give feedback and comments. Or create their own board and add articles, assignments to share with their fellow students. In this article, I will be showing you how to share your Padlet successfully.
How to share a Padlet
First before sharing your Padlet, you have to adjust your privacy settings. There are different privacy settings on Padlet where you determine who can have access to your Padlet board.
The default privacy setting is set to SECRET, so only people with the link can access your Padlet. You can change the settings to PRIVATE, then invite a user before they can access the board.
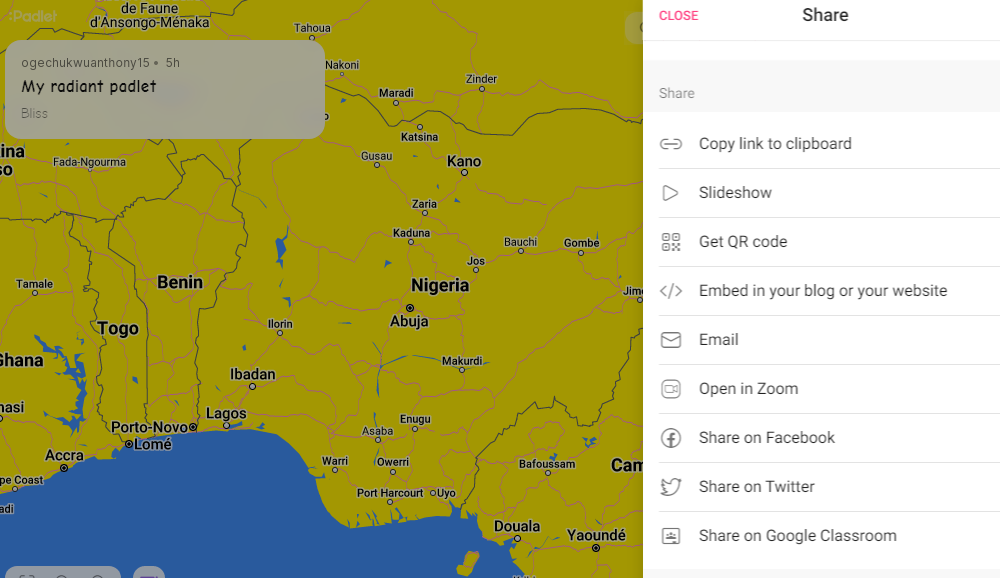
There are different ways to share a Padlet board after creating one, the options are:

Method #1: Copy link to Clipboard
This option allows you to copy the link to your board to the clipboard. Then paste and send to the people you want to access the board. You can paste the link straight to their Email or in a group chat.
Method #2: Slideshow
This sharing option allows you to open a new tab with a slideshow generated based on your Padlet. Then you can share a direct link once the slideshow is open.
Method #3: Get QR code
Another way to share a Padlet is to generate a QR code for others to scan. Padlet is supported on mobile as well as desktop app, and in your browser. Others can scan the code and have access to the board.
Method #4: Embed in your blog or your website
You can copy the embed codes from yourPadlet board and paste them on a site or blog so people reading the blog can easily access the board from there.
Method #5: Email
You can share the link to the Padlet in the other user’s Email, just select this option and input the email address of the recipient.
Method #6: Open in Zoom
Padlet can be integrated into the Zoom app. Just click the Open in Zoom option and follow the prompts to share your Padlet to Zoom.
Method #7: Share to Facebook
Padlet can also integrate with social media platforms, that is why you will see an option to share Padlet to Facebook. You have to draft a post and input your link on the post and post on Facebook.
Method #8: Share to Twitter
Same way you shared your Padlet to Facebook is the same thing with Twitter. Just draft a tweet and input your padlet link for easy access by readers.
Method #9: Share on Google Classroom
Padlet perfectly connects with Google Classroom. Just select the option and open Google Classroom in a new tab. Follow the next prompts until your Padlet is successfully shared to Google Classroom.
Tip: For others to be able to contribute to your Padlet after having access to it, you have to set the Visitors Permissions to ‘Can write’. This way visitors can access and also contribute to the board. You can change the permission to “Can read” to allow them to read only.
Before you go…
Sharing your Padlet board is not a complicated matter at all. Just follow the steps highlighted above. You can read my next article How to create a Padlet board and share on Google Classroom to know more about sharing your Padlet board.


